Friday, August 29, 2025
Building ffmpeg 8.0 with MP3 support on macOS Sequoia on Silicon
Thursday, May 22, 2025
Just a QR Code
Every once in a while you need to generate a QR code. You type "qr" into your address bar and hope your history still has something useful, but when it doesn't, you go ahead and google it. Reviewing the array of results, you pick the least sketchy-looking one. You enter your text, save the QR code, and quickly close the browser tab. Why so furtive?
Because you know that the site's not just randomly passionate about giving free QR codes to the world -- it's not some Johnny Appleseed of machine-vision -- someone expects to get paid. And that's why the page includes ads, it's laden with trackers, whatever you type is sent to a remote server, and it's setting all kinds of cookies on your browser. All for just a QR code.
"Isn't it possible to just make a one-page website that uses Javascript to generate QR codes? Something I could save to disk and run locally," I pondered.
Yes. Yes it is. (Spoiler, here it is.)In about 19k of HTML and Javascript (and half of that is comments and easter eggs) it does exactly what you'd expect. You type something, it makes a QR code. You can also set the size, error correction, and colors. And that's it. Just a QR code. Holy heck it works. And there is no "pro" plan.I uploaded it to my webserver for sharing. And as I looked at the URL I realized, yes, I definitely need to be paying for another single-project custom domain name. My project shall have no path in its URL! It shall be the one and true main page. After half an hour of trying to be clever, I discovered that "just a qr code" dot com was available for ten bucks. Sure, whatever. Ship it!
I present to you: justaqrcode.com
Check it out -- you can view the page source and confirm that it doesn't send anything anywhere. There are no trackers. You can save it to your local disk and run it from there. Go ahead and modify your copy to suit your own needs.
What's my payback for the domain name and hosting costs? I don't know. But I'm really annoyed at the state of the world right now and this is somehow my way of fighting back. I'll keep paying for the domain name and hosting, and you keep being awesome.
Tuesday, June 4, 2024
Building a Poetry Camera
If you've got a working Pi with a camera, here's my script. The README file has all the details on what you need to add to your Raspberry Pi base OS and how to run the script. Have fun!
Saturday, May 28, 2022
Opening the Garage with a Wave of My Hand
So here's the story. To get into my building's garage, I need to wave an rf-enabled key at a reader. Problem is that I ride, so I have gloves on. I have to stop just before the gate, take a glove off, fish the key out of my pocket, stuff it into my other glove, put the first glove back on, then ride up to the gate, scan, and ride in with it still in my glove, fully expecting it to fall out on the way.
I don't know how many commas I used enumerating that long sequence of events. Clearly too many. Something must be done. Think of the children.
So, I know that people are getting teenty-tiny rfid chips crammed into their hands. What if I could glue/sew one of those onto my gloves? (Spoiler: I ended up going a different way.) Then I could just ride up, wave my glove, and ride on in!
Step one was to try to duplicate the key at all. So I popped over to eBay and looked for a duplicator. The popular match (a blue thing from China) says it's for 125 KHz and a quick search on the interwebs indicated that my keyfob likely is one. They all come with a few blanks included, even. I found a US shipper and committed twelve dollars to the experiment.
It arrived, I tried it out (beep boop!) and the duplicate fob it made worked just fine on the garage. (And the building front door and the elevator.) I enlisted friends and made copies of their keys for them -- those also worked!
Alright, now to duplicate my key onto a teeny-tiny chip. That did not go so well. I mean, I completely got the wrong type of chip, had no idea what I needed, and utterly failed. (Though now I know exactly which one I needed.)
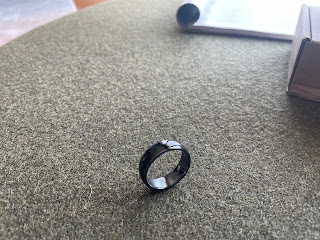
There's something really magical about showing people how easy it is to clone these things. Particularly because there's something really magical about how your apartment building wants to charge you a hundred bucks if you ask them for a spare copy. These things cost fifty cents, dudes! (There's a reason why land owners are the first against the wall when the revolution comes.)Back to the project though. During my research I discovered that you can actually get a ring with a chip in it! Add to cart! Ship it!
And ... success! Now when I ride, I put on my ring, and opening the garage is just a wave of my hand. Total cost of the parts (that worked) is under fifty bucks. And my friends love me because I can make them spares, too. This was a good project!
Wednesday, April 27, 2022
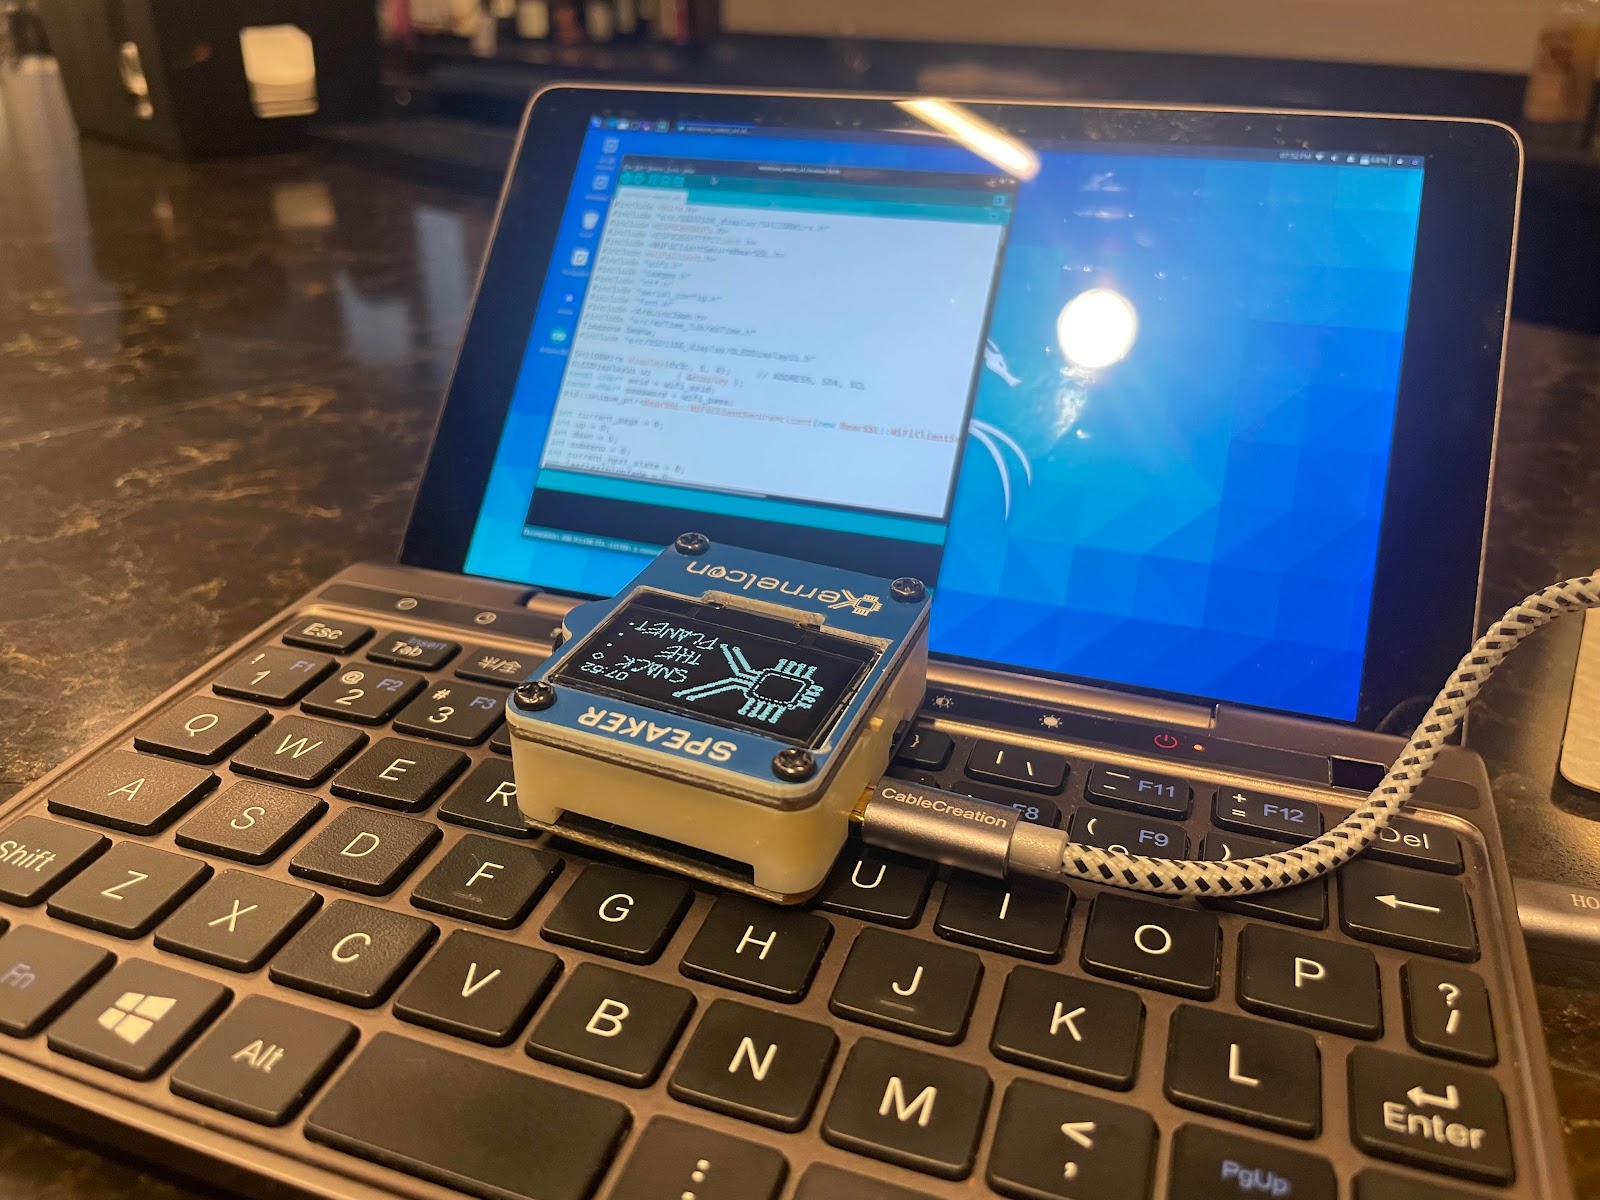
Updating the Kernelcon 2022 Badge Wifi
Let's do the Arduino set-up first:
- Download and install the Arduino IDE
- Open it up and go to File > Preferences
- In "Additional Boards Manager URLs" add
https://arduino.esp8266.com/stable/package_esp8266com_index.json - Hit "OK"
- Go to Tools > Board: ____ > Boards Manager
- For "Filter your search" type "ESP8266" and let it find the module
- Click "Install" and it should download and install the add-on
- Click "Close" when that's done
- Select Tools > Board: ____ > ESP8266 Boards > Generic ESP8266 Module
- Select Tools > Flash size: ____ > 4MB (FS:1MB OTA:~1019KB)
- Plug in your badge and switch it on
- Go to Tools > Port and select the port it's on. (Kali picked /dev/ttyUSB0)
At this point, you can load whatever Arduino code you like. The official Kernelcon badge code uses a JSON library, so if you're going to reload the official code, install the JSON library first.
- In the IDE select Tools > Manage Libraries
- Search for "ArduinoJson" and click "Install" to add it
- Click "Close" when it's done installing.
Finally, let's fetch the original badge code, update the wifi settings, and upload it to the badge.
- Download and unzip the ZonkSec kernelcon-2022-badge code
- In the Arduino IDE, open kernelcon_watch_v4.ino
- This opens all the source files. Select the wifi.h file tab
- Update the SSID and password values and save the file
- Select Sketch > Upload and watch it compile and transfer
- The badge will restart, and it should use your updated wifi settings as it does.
That's it! Mess around with the badge code some more, if you like. Or go find some ESP8266 code and mess with the little guy. For me, my next step is to try to get the original deauther code running.
Saturday, December 11, 2021
Installing wget on MacOS from source
I recently had the time-consuming pleasure of trying to get wget onto my Mac ... without using homebrew. Don't get me wrong, I think homebrew is a really helpful project, but it also kind of feels like curling a script and piping it into a root shell. Here's what I did (on MacOS Monterey) to build and install from source.
Step 1: You're going to need either OpenSSL or gnutls libraries (not just the binary) in order to build it. I chose OpenSSL. Honestly, I picked it simply because it was the only one I could get to compile.
git clone git://git.openssl.org/openssl.git
cd openssl
./config
make
make -n install # Dry run, for a sanity check.
sudo make install # Actually do the install.
Step 2: Now you can compile wget -- we just need an extra flag in the configure step, to tell it we're using OpenSSL. The last command here updates your wget config to tell it where to find the trusted TLS certificates on a Mac.
curl -o wget.tar.gz https://ftp.gnu.org/gnu/wget/wget-latest.tar.gz
tar -xzf wget.tar.gz
cd wget-*
./configure --with-ssl=openssl
make
make -n install # Sanity check.
sudo make install # VĂ¡monos.
echo 'ca-certificate=/etc/ssl/cert.pem' >> ~/.wgetrc
There you go! Three hours of your life back.
Sunday, August 30, 2020
Running Kali 2020.3 on an original GPD Pocket
I recently needed to dust off my wifi skills, and to keep a low profile, I use my GPD Pocket laptop. My install of Kali was old, so I decided to see if I could load Kali 2020.3 on it. After much searching and futzing about, it turns out almost everything works right out of the box. You need a couple files, some settings, and a trick with the installer. I also found the archlinux wiki page on GPD really useful, oddly enough.- Run the text-mode installer.
- When you're asked to load the brcm files from a USB drive, say "no."
- It will successfully find all the APs around you, so select yours.
- But, it *won't* be able to negotiate WPA2 without the missing files.
- Tell it you're using an open wifi network.
- Let this fail. (If you'd told it WPA2 it it would be in a loop of failing and re-asking you the PSK.)
- Now, select the option to continue without a network connection.
- Install and reboot.
- Log in to your new system.
- (If your screen is rotated, click to the Kali logo, pick Settings, then Display, and set Rotation to "Right.")
- Put a copy of this brcmfmac4356-pcie.gpd-win-pocket.txt file on a USB drive. (Kali can read FAT.)
- Write a copy into /lib/firmware/brcm/brcmfmac4356-pcie.gpd-win-pocket.txt on Kali.
- Reboot. (I know, I know, I could use modprobe.)
- Log in to your system.
- Click the Kali icon, choose Settings, then Advanced Network Configuration.
- Double-click your SSID.
- Go to the Wi-Fi Security tab.
- Update your settings to reflect that you use WPA, and provide a password.
- Save
You'll also need to tweak the touchscreen configuration, which doesn't know it is rotated, yet.
- Edit /usr/share/X11/ xorg.conf.d/40-libinput.conf
- Inside the "InputClass" stanza for "libinput touchscreen" add this:
- Option "CalibrationMatrix" "0 1 0 -1 0 1 0 0 1"
- Restart
Tuesday, September 19, 2017
Build a Puppet 5 Master on CentOS 7 -- Hella Quickstyle
Install the Master
I'll be using Puppet Labs' own yum repositories for the install. The repository definition can be installed by grabbing an RPM.rpm -Uvh https://yum.puppetlabs.com/puppet5/puppet5-release-el-7.noarch.rpm
Now it's a piece of cake to install the puppetserver package and its dependencies.
yum -y install puppetserver
The default configuration has the master's JVM start with a 2 gb heap size. That's way more than I need. (Your mileage will vary.) Let's bring that size down.
sed -i -e 's/-Xms2g -Xmx2g/-Xms128m -Xmx512m/' /etc/sysconfig/puppetserver
Now I can start up the Puppet server.
systemctl start puppetserver
If you like, make a symlink to the puppet binary in /usr/local/bin.
ln -s /opt/puppetlabs/puppet/bin/puppet /usr/local/bin/puppet
The package adds configuration for the master, but not the agent, so I'll add a stanza telling the agent to fetch catalogs from itself.
cat >> /etc/puppetlabs/puppet/puppet.conf <<EOF
[agent]
server = `hostname -f`
EOF
Now the agent should be able to run.
puppet agent --test
Finally, I'm going to tell firewalld to allow TCP connections to port 8140, so that other nodes can request catalogs from my master.
cat > /etc/firewalld/services/puppetmaster.xml <<EOF
<?xml version="1.0" encoding="utf-8"?>
<service>
<short>puppetmaster</short>
<description>Puppet Master</description>
<port protocol="tcp" port="8140"/>
</service>
EOF
firewall-cmd --permanent --add-service=puppetmaster # may take two tries
firewall-cmd --reload
Add PuppetDB
Next, I'll use Puppet to install and configure PuppetDB. First, I need to install a module. I'm not going to use r10k to manage the modules I need, but in the real world, you probably would. I'm just going to use the Puppet Module Tool to throw it directly into the production code environment.puppet module install puppetlabs-puppetdb
Now I classify my master with puppetdb classes. I'm going to add a node definition for my master to the site.pp manifest. (And I'll add a default node, for the future.) When I declare the puppetdb class, I'll tune my memory requirements down, and tell it not to manage my firewall.
cat >> /etc/puppetlabs/code/environments/production/manifests/site.pp <<EOF
node '`hostname -f`' {
# Install and configure PuppetDB
class { 'puppetdb':
java_args => { '-Xms' => '128m', '-Xmx' => '256m' },
manage_firewall => false,
}
# And configure the master to use PuppetDB
include puppetdb::master::config
}
node default {
notify { 'Default node definition ... no classification found!':}
}
EOF
Let's make sure it's working. First, do an agent run, which should make the master submit a report to the PuppetDB.
puppet agent --test
And now try a (convoluted) curl request straight into the local PuppetDB, to list nodes that are classified with the "Puppetdb" class. Note: if you adapt and re-use this later, make sure to run it from the master.
curl -X GET \
--tlsv1 \
--stderr /dev/null \
--data-urlencode "query=[\"and\",[\"=\",\"type\",\"Class\"],[\"=\",\"title\",\"Puppetdb\"]]" \
--cert $(puppet config print hostcert) \
--key $(puppet config print hostprivkey) \
--cacert $(puppet config print localcacert) \
https://`hostname f`:8081/pdb/query/v4/resources | python -m json.tool
Add Agent Nodes
For quick reference, here are the steps to add just the Puppet agent to a node. All you need to do is add a yum repo, install the puppet-agent package, aim it at your new master, and run. Make sure to replace FQDN_OF_YOUR_MASTER in the example below.rpm -Uvh https://yum.puppetlabs.com/puppet5/puppet5-release-el-7.noarch.rpm
yum -y install puppet-agent
cat >> /etc/puppetlabs/puppet/puppet.conf <<EOF
[agent]
server = FQDN_OF_YOUR_MASTER
EOF
puppet agent --test --waitforcert 10
Future Direction
These instructions use the Puppet module tool to install the puppetdb module. That throws it directly into /etc/puppetlabs/code/environments/production/modules. Most production-grade Puppet masters use 'r10k' to manage the modules that they need, automatically pulling them from version control or the forge, rather than adding them by hand. The documentation for r10k is here.Wednesday, April 26, 2017
Spoofing a Hardware MAC address on MacOS
There you are at the hotel bar, where the wifi has a captive portal. You want to get your Arduino or Raspberry PI or ZipIt Z2 or something on the wifi, but there's no way you're going to get it to login to a captive portal on its own. No problem. Have your MacBook pretend to be the hapless device for long enough to login to the captive portal, and then make your MacBook go back to being itself. The captive portal doesn't know the difference, and will think your other device is already logged in when it tries to associate.
Open the Terminal app on your Mac. Run `ifconfig` to see what your wireless adapter's official MAC address is -- it's the "ether" line -- and make a note of it if you don't feel like rebooting later.
ifconfig en0
Now, set your MacBook's MAC address to whatever your other device's MAC address is ... down the interface ... and up the interface
sudo ifconfig en0 ether 00:1D:04:01:02:03
sudo ifconfig en0 down
sudo ifconfig en0 up
Then, restore your Mac to its proper MAC address -- which you noted when you first ran the `ifconfig` command -- or if you didn't bother reading that part of the instructions, reboot your Mac to restore it to its original MAC address. However you do it, make sure your Mac stops pretending to be the other device.
sudo ifconfig en0 ether 00:88:65:01:62:01
sudo ifconfig en0 down
sudo ifconfig en0 up
Monday, March 27, 2017
Cloning a VingCard "Original" punch-hole keycard
This is the most interesting hotel key you've never seen. It's space-age, and hails from a time where tossing plastic in a landfill involved no thought for the future. One word. Are you listening Benjamin? Plastics.
This is the original asymmetric key-pair. Hotels order a stack of keys, that consist of a programming side, and a "guest" side. The staff use a conventional brass key to open the door. Once open, they slip the programming end into the back of the lock, and it programs the lock for the corresponding "guest" portion. You snap it apart, hand the opening part to the guest, and toss the programming side in the trash. The programming side can't open the door, and the opening side can't be guessed from knowing the programming side. (Okay not a likely reality with today's computing power, but back then quite possible.)
Flawless security! And it's from the future! So let's see if I can copy one.
Looking over a patent for a device that can detect the pin configuration currently configured, it appears that the key, when inserted, selectively pushes up some ball bearings allowing a plate to move freely. That's about all I can figure out. So, is it the holes, or the lack of holes that's important? Maybe it's both.
Well, gift cards are only a little thinner than this thing, and I can cut one down to the right width. So I "borrow" an empty gift card from a local purveyor of coffee. Drop the key on top of it, trace the outline and holes with a sharpie, and take a pair of small, pointy scissors to it.
Nope. Looks like at the very least, the not-holes are significant.
Fine. Be that way. But, I live in the future, too. I put a request for bids up on People Per Hour, including pictures of the card, and ask what a professional will charge me to send a ready-to-print 3D representation of it. The answer? $120. And that's only because the person had a one-hour minimum.
A day later, and I've got the file in-hand. Upload to thingiverse, enter my credit card, pick a swanky color. And a couple days later it arrives.
It works!
So far I've only seen this sort of key once. It was a building that used to be a hotel, and then I think it became a residential hotel, and now it's mostly apartments with art school students packed in, two per two-hundred square foot efficiency unit.
Not cheap, to copy those things. But for an art student who's perpetually losing their key, it could come in handy. The building charges fifty dollars each, to replace these antiques. And they can't help you at four AM, when you realize you lost it. Having a spare on-hand might be worth it.
Charging a ZipIt Z2 off USB
I love my little ZipIt Z2. I don't always make room for it in my bag, and it was annoying me to cart around yet another adapter. Taking a look at the back of the adapter, though ... five volts, you say? 1.2 Amps? That sounds a lot like what USB provides!And it turns out it works. I chopped the barrel connector off the one end, and cannibalized one of the million USB cables I've accumulated in my life. Twist them together to test -- solder them once I've got the polarity right -- and I'm all set. Now it can travel with me, with one less accessory.
Friday, June 17, 2016
Crib Notes for Cocktail Hour
- This is why we can't have nice things on the International Space Station.
- You might have guessed that being an asshole in online games translates to being a dick at work. But Riot games did a study on their own employees, and has the data to back it up.
- Want to see some great mural work? There's now an online archive of Clarion Alley art by some really cool fans.
- Speaking of the Mission, Mission Hipster Says is pretty funny until you realize how close to a documentary it is.
Thursday, February 18, 2016
Crib Notes for Cocktail Hour
- Paranoid about quad-copters taking over the world? So are the Tokyo police -- so they've deployed a drone-catching drone. A drone just doesn't know who to trust, these days.
- If you missed it, Apple published a letter explaining why they refuse to weaken privacy protections on an iPhone, no matter who's asking for it. How often does a corporation actually speak truth to power?
- Next time I renew my California Driver [sic] License, I'll be wearing a colander on my head. In several legal interactions, Pastafarians have won the right to keep their spaghetti-straining religious head covering in place -- as long as their face is completely visible -- despite rules that require heathens to remove things like baseball hats.
- Well, the authors hand-picked their online-only data sources, and only worked with mean and standard deviation ... but who's going to stop a cocktail party conversation to check your sources? You can now cite an actual article on average penis size.
Saturday, November 7, 2015
Off the Graph -- Prepaid Cards
They act like a real card. You can load them up to $500 dollars before they become a "financial instrument" and suddenly everyone wants to know who you are and where you live. Malls like to sell these as "universal gift cards" and you can also pick them up at just about any large-ish drug/convenience/grocery store. There's even a machine in the San Diego airport that will issue you one for a flat $5 transaction fee.
Fun fact -- the sketchier hotels I've stayed in seem to be switching over to vending machines that only take cards. Who wants cash sitting around waiting for someone to try to break in? The idea of using a card for a buck twenty-five purchase is a little odd to me though, considering the cut the processor takes.
And I've been on gigs where the company break-room has an "open canteen" that's a bunch of stuff on shelves and a machine to handle the payment part. You scan your things, then swipe your card, and it charges you for the stuff. They do not take cash.
So far, it's been hit-or-miss with these things. Merchants (or machines) can actually just refuse to take them -- I assume they can tell from the issuer id. And if you don't want to register your card on the issuer's web site, you're going to have trouble providing the billing zip code when a site or gas pump asks for it.
But they do seem to work in the necessity situations like vending machines and buying drinks on an airplane. It's fun seeing where they work and where they don't.
Wednesday, August 5, 2015
Terminal Terminals
Then, there are otherwise sensible Point of Sale terminals that run Windows. Honestly, you're trying to keep your money, not lose it. Why would you trust it to a system with such lousy security? Pictured below is a Canteen "Open Vending" POS.
Speaking of money, one of my favorite finds was a crashed NCR ATM in the Netherlands. I like that the designers at least put a desktop wallpaper on the system that instructs the user not to enter their PIN. (Though, in English.)
Finally, I shot a picture of an advertising display that lost its mind. I'm curious about this one, because it's offering to send crash feedback to Logitech. Either Logitech's getting into a new market, or this thing is a kludge using some sort of Logitech slideshow app. Or maybe it's just that a mouse driver blew up and took the rest of the system with it.
Tuesday, August 4, 2015
Crib Notes for Cocktail Hour
- Data centers use a little over 1% of the world's electricity. Is that big or small? I don't know. Fun to have a number to think about, though.
- You could say, "orange light makes you smarter," but a neuroscientist says it differently.
- Genetic analysis suggests that dogs were domesticated before agriculture arose. They actually roved around with us. Come to think of it, does that explain why they like walks so much?
- Amazing time-lapse dataset ... ever seen a volcano breathe?
Wednesday, July 22, 2015
Guerrilla Fix-It: Hotel Lamp Edition
Someone "fixed" it. I've been to this hotel dozens of times, and none of the other rooms have it like this. I guess it's just a matter of having a screwdriver with you ... but who took the time? Some sort of Robin Hood electrician is on the loose.
Wednesday, July 15, 2015
Going "Off the Graph"
![]() |
| Königsberg's Troublesome Bridges |
It's the graph that spooks me. It's the connection of every digital transaction (money, tweet, border crossing, phone call) you ever make into one big fat map that suggests ("profiles?") who you are.
You don't have to be paranoid about the NSA watching every single thing you do. (Ding! Just added a node to their graph.) You could be paranoid about stores watching your buying habits to target you with marketing. For instance, as my brother explains, when you purchase felt pads to keep your furniture from scratching the floor, you get added to a marketing list of new homeowners. It's presumed that your sudden care for floors stems from presently owning them, instead of renting them.
Is it possible to reduce the number of nodes you're adding to your graph, in this day and age? I'm curious. Drug dealers have been doing it for ages with "burner phones." Executives count on the fact that their hotel pay-per-view purchases will be "discreetly charged." You can't surprise your partner on Valentines' Day if they saw the hotel room deposit on your joint credit card statement.
So. How far off the graph can a fully functional, modern-day, employed, human get?
Wednesday, July 8, 2015
Changing VMware Fusion DHCP Lease Times
Well, you can change the default and maximum lease times that Fusion gives out to guests by using the `vmnet-cfgcli` command. It's pretty easy, and you do it on a per-vmnet basis. To query the current values, for example on the NAT vmnet8 device, goes like this:
Thursday, April 9, 2015
Build a Puppet Master on CentOS 7 -- Hella Quick-Style
Build a CentOS 7 machine and set its hostname. I'm going to call mine "kermit.localdomain."
hostnamectl set-hostname kermit.localdomain
Then add the official PuppetLabs yum repo to the system's sources.
rpm -ivh http://yum.puppetlabs.com/puppetlabs-release-el-7.noarch.rpm
Now yum can install the Puppet Master for you.
yum -y install puppet-server
The easiest way to generate the Master's SSL keypair and self-sign its certificate is to just start up the Master in the foreground and then control-C out of it once it's done the SSL bits. (There must be a more elegant way to do this.)
puppet master --verbose --no-daemonize
[Ctrl-C]
Aim the Master's own Agent at itself. The last stanza in a stock Puppet install's puppet.conf is the [agent] section, so we can get away with just appending to it. (Again, using "kermit" in this example.)
echo 'server = kermit.localdomain' >> /etc/puppet/puppet.conf
Add a [master] stanza to the puppet.conf file. On a stock install, it's safe to just append to the file.
cat >> /etc/puppet/puppet.conf <<EOF
[master]
environmentpath = \$confdir/environments
basemodulepath = /etc/puppet/modules
reports = store,log
EOF
The Master won't start without a production environment, so make an empty one.
mkdir -p /etc/puppet/environments/production/{modules,manifests}
echo 'node default {}' > /etc/puppet/environments/production/manifests/site.pp
Copy the package-supplied Hiera configuration file to a place where the Master can find it. Later, you'll likely need to update the 'datadir' and your hierarchy, but for now the stock one is fine.
cp /etc/hiera.yaml /etc/puppet/hiera.yaml
Set up firewalld with a rule for Puppet traffic on port 8140.
cat > /etc/firewalld/services/puppetmaster.xml <<EOF
<?xml version="1.0" encoding="utf-8"?>
<service>
<short>puppetmaster</short>
<description>Puppet Master</description>
<port protocol="tcp" port="8140"/>
</service>
EOF
Tell firewalld to use the rule.
firewall-cmd --permanent --add-service=puppetmaster # may take two tries
firewall-cmd --reload
And finally, start up the pieces.
puppet resource service puppetmaster ensure=running enable=true
puppet resource service puppet ensure=running enable=true
That's it! If you have to troubleshoot, tail /var/log/messages for clues. Remember, you can kick off Puppet runs manually with `puppet agent -t` to see what's going on during a run.