Showing posts with label undocumented. Show all posts

Wednesday, April 27, 2022

Updating the Kernelcon 2022 Badge Wifi

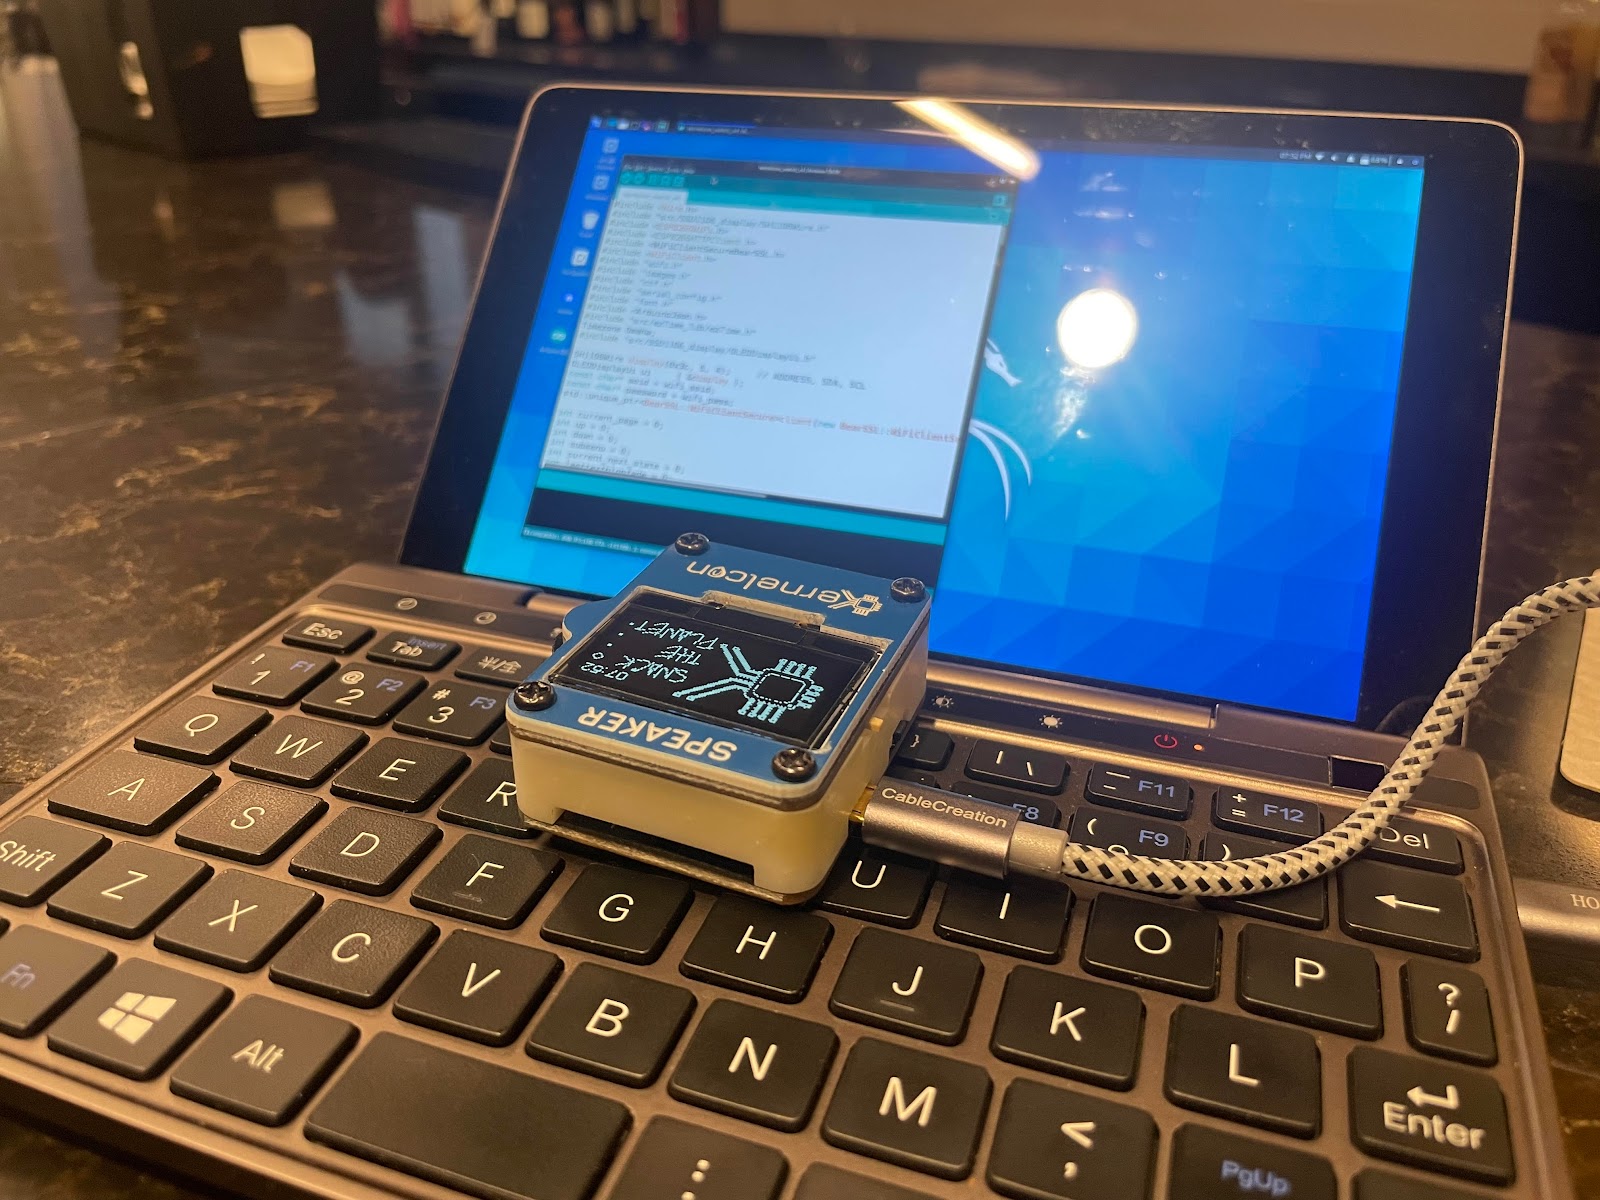
So you got home, powered up your Kernelcon 2022 badge, and discovered that it won't boot without the conference wifi network?  It took me a little bit, but I finally figured out how to reflash the thing with new wifi settings.  Turns out you just need to teach an Arduino IDE to talk to an ESP 8266 board, and you can upload the code with new wifi settings easily.

Let's do the Arduino set-up first:

  1. Download and install the Arduino IDE
  2. Open it up and go to File > Preferences
  3. In "Additional Boards Manager URLs" add
    https://arduino.esp8266.com/stable/package_esp8266com_index.json
  4. Hit "OK"
  5. Go to Tools > Board: ____ > Boards Manager
  6. For "Filter your search" type "ESP8266" and let it find the module
  7. Click "Install" and it should download and install the add-on
  8. Click "Close" when that's done
  9. Select Tools > Board: ____ > ESP8266 Boards > Generic ESP8266 Module
  10. Select Tools > Flash size: ____ > 4MB (FS:1MB OTA:~1019KB)
  11. Plug in your badge and switch it on
  12. Go to Tools > Port and select the port it's on.  (Kali picked /dev/ttyUSB0)

At this point, you can load whatever Arduino code you like.  The official Kernelcon badge code uses a JSON library, so if you're going to reload the official code, install the JSON library first.

  1. In the IDE select Tools > Manage Libraries
  2. Search for "ArduinoJson" and click "Install" to add it
  3. Click "Close" when it's done installing.

Finally, let's fetch the original badge code, update the wifi settings, and upload it to the badge.

  1. Download and unzip the ZonkSec kernelcon-2022-badge code
  2. In the Arduino IDE, open kernelcon_watch_v4.ino
  3. This opens all the source files.  Select the wifi.h file tab
  4. Update the SSID and password values and save the file
  5. Select Sketch > Upload and watch it compile and transfer
  6. The badge will restart, and it should use your updated wifi settings as it does.

That's it!  Mess around with the badge code some more, if you like.  Or go find some ESP8266 code and mess with the little guy.  For me, my next step is to try to get the original deauther code running.

Wednesday, August 5, 2015

Terminal Terminals

I'm always fascinated when everyday computer interfaces go sideways.  It's a little peek into the innards of the things.  For instance, I was at the Chicago airport when a storm knocked the power out.  They switched to backup power, but not quickly enough ... all the boarding pass terminals rebooted.  So I took a picture.


Then, there are otherwise sensible Point of Sale terminals that run Windows.  Honestly, you're trying to keep your money, not lose it.  Why would you trust it to a system with such lousy security?  Pictured below is a Canteen "Open Vending" POS.


Speaking of money, one of my favorite finds was a crashed NCR ATM in the Netherlands.  I like that the designers at least put a desktop wallpaper on the system that instructs the user not to enter their PIN.  (Though, in English.)


Finally, I shot a picture of an advertising display that lost its mind.  I'm curious about this one, because it's offering to send crash feedback to Logitech.  Either Logitech's getting into a new market, or this thing is a kludge using some sort of Logitech slideshow app.  Or maybe it's just that a mouse driver blew up and took the rest of the system with it.


Wednesday, July 8, 2015

Changing VMware Fusion DHCP Lease Times

At any one time, I've got a dozen or so virtual machines that I might want to boot a subset of.  Monday and Tuesday I might need one bunch, but Wednesday through Friday another.  VMware Fusion's default lease time is a day, which means frequently those early-week machines are assigned IPs that the later-in-the-week machines were previously using.  Flip-flop batches and they collide.

Well, you can change the default and maximum lease times that Fusion gives out to guests by using the `vmnet-cfgcli` command.  It's pretty easy, and you do it on a per-vmnet basis.  To query the current values, for example on the NAT vmnet8 device, goes like this:


  sudo /Applications/VMware\ Fusion.app/Contents/Library/vmnet-cfgcli getdhcpparam vmnet8 defleasetime
  sudo /Applications/VMware\ Fusion.app/Contents/Library/vmnet-cfgcli getdhcpparam vmnet8 maxleasetime

And you set the values, again with an example on the NAT network, like this:

  sudo /Applications/VMware\ Fusion.app/Contents/Library/vmnet-cfgcli setdhcpparam vmnet8 defleasetime <seconds>
  sudo /Applications/VMware\ Fusion.app/Contents/Library/vmnet-cfgcli setdhcpparam vmnet8 maxleasetime <seconds>

Restart VMware Fusion and you're all set.  Machines requesting a new lease will now receive one with the updated settings.  By the way, a week is 604800 seconds.

Tuesday, July 29, 2014

Right Turn on Red?

Okay, so I drive in lots of different places.  I figured I'd better get a grip on which states allow you to turn right at a red light after stopping.  (Little known fact: in California, "stop" is an acronym.  It stands for "softly touch other pedal.")

The Wikipedia article on the subject is, well, a festival of "citation needed" requests.  So I wandered around a little to try to sort it out.

It looks like it's a Federal guideline.  Maybe.  It actually might be just a recommendation of the National Committee on Uniform Traffic Laws and Ordinances.  Their idea was that you should be able to expect similar driving laws in all the states of the union.  (Think base speed limit, dui, dwb, &c.)  If you collect antiques, you're in luck, their website says "Copyright 1997."  Take that, time travel naysayers!

Ostensibly, it's for fuel economy, and seems to've been promoted in the late seventies when the US was enjoying an early beta-test of the Manufactured Fuel Shortage(tm) system.  You don't want cars idling at a red light if they can safely proceed through the intersection and down to a nearby gas station.  Feed the beast.

The exception?  The five boroughs of New York.  Which means New Jersey wishes they had the same thing, but just can't manage to pull it off in a cheap-but-still-classy way.  Anywhere else though, you're probably fine unless otherwise posted.  Clever tip from a site's comments: stay stopped at the red light, and if the person behind you honks, it's legal to turn there.

Monday, September 23, 2013

Toggle a MacBook's Wifi with a Bash One-Liner

Sometimes the easiest way is a bash one-liner.  (Think Alfred shortcuts, BetterTouchTool gestures, Terminal.app.)  Running an applescript is all fine and dandy, but it's heavy.  Here's how to toggle your MacBook wifi on or off, where the wifi interface is en0.

( networksetup -getairportpower en0 | grep On ) \
   && ( networksetup -setairportpower en0 Off ) \
   || ( networksetup -setairportpower en0 On )

This is one of those messed-up bash-isms that uses conditional logic in the "wrong" way, elegantly.

Saturday, June 30, 2012

Apple's Missing "Insert" Key

The extended Apple keyboard lacks an "insert" key.  If you're running Windows in a virtual machine, there are some apps where that key would be very useful.  Well, it turns out that a Windows virtual machine sees your keyboard a little differently than MacOS does.  Press the "clear" button, and you're actually toggling the "numlock" setting.  Once out of numlock mode, pressing the zero key is actually hitting the "insert" key.

The Storage Admin's DIY SFP Stylus

Check it out, the little rubber end-caps that come on some fibre SFPs are detected by a capacitative display!  It's only some of them.  We went through a pile at work and found that about one in five was able to impersonate a finger.  Dunno why it works, but it opens up some great possibilities for a DIY stylus.  (Maybe the rubber is doped with an EMF-blocking material.)

The discovery was pretty funny.  I was installing SFPs and tossed a bunch of the end-caps on my powered-on iPad for safe keeping.  The tablet went nutz from all the multitouches.

Wednesday, May 2, 2012

Motorcycle Parking in Downtown San Diego

Click here for the map.
I've just published a publicly-editable Google Map of San Diego motorcycle parking spots that I've found.  I was recreating the map in my head each time I went downtown .. with a couple spots committed to memory just because I knew they were near a good restaurant.  So, I made a real map.  Enjoy!

Sunday, March 11, 2012

Flipping your Mouse Wheel in Windows 7

I've gotten used to Lion's goofy "natural scrolling" behavior.  When I bootcamp over into Windows, the "normal" scrolling irks me.  I've found two (Volker Voeking and Tom Mason)  perfect posts on how to do this in the registry (without using flakey softwarez) but they weren't entirely obvious for my Mighty Mouse.  If you know the hardware ID might start with a big mess between braces, you should be able to just use either of those.

Here's my quick redux for my own remembery porpoises:
  • Open Control Panel > All Control Panel Items > Mouse.
  • Go to the Hardware tab, take a look at the Location for each device.
  • Get the Properties of the mouse you wanna flip.
  • Go to the Details tab, select Hardware ID from the Property drop-down.
  • The entry containing "VID" somewhere in it is what you want.
And then do the registry pieces:
  • Hit the Windows (command) key, "regedit" and hit return.
  • Expand HKEY_LOCAL_MACHINE > SYSTEM > CurrentControlSet > Enum > HID
  • Expand whatever device ID you found previously, expand whatever garbled entry is under that.
  • Select Device Parameters, right-click on FlipFlopWheel, then choose Modify.
  • Change this from 0 to 1.
  • Exit.
The next time your mouse is recognized, it'll inherit the new setting.  To make that happen, you can just power it down, wait a dozen seconds, and power it back up.  That otter do it!  Welcome back to wackyland.

Wednesday, January 11, 2012

Flipping Vertical Scrolling Behavior in X Windows

I've grown used to Mac OS "natural scrolling" on my trackpad.  So when I recently set up a few ubuntu netbooks, for a quick lab experiment, I wanted to have their trackpads behave the same.  It's actually pretty simple to tell X windows to flip 'em.

Short story, on a completely stock ubuntu, (and should work for anything) this will flip your scrolling:
  • open a terminal
  • run `echo "pointer =  1 2 3 5 4 6 7 8 9 10 11 12" >> ~/.Xmodmap`
  • logout of your X windows session.
  • log back in.
  • ta-da.
Long story, since the days of the dinosaurs, X Windows has been really nice about letting you remap your mouse keys .. southpaws would frequently swap their left and right buttons.  The `xmodmap` command provides an interface for this stuff.  Try `man xmodmap` and `xmodmap -help` for more details.  The above instructions just append a custom button setting to the rc file that xmodmap evaluates at log in.

Up and down scroll are considered physical buttons 4 and 5, respectively.  The "pointer = " statement above has 4 and 5 swapped.  Simple as that.

Use `xmodmap -pp` to display your current button mappings, and `xmodmap -e "pointer = default"` to reset to normal.  If you want to suss out where all of your buttons are, launch `xev` to see what events X is handling .. look for the ButtonPress event and note the "button" attribute.

Thursday, December 29, 2011

Fuzzy Logic

You know how your mobile carrier likes to accidentally "forget" that you don't want to receive marketing messages?  Gosh I wonder how that happens.

Anyways, the folks programming the automated texting system seem to understand your frustration.  You don't necessarily need to reply "stop" ... if you can find better words to express it.

Wednesday, December 14, 2011

Typing a Backtick ` in iOS

  • tap the .?123 key
  • press and hold the single quote '
  • backtick is in the ensuing pop-up

Thursday, November 24, 2011

Minecraft on Mac OS X with 64-bit Java

So you're a slave to warning messages and you want Minecraft to use 64-bit Java.  Here's how to do it on the command line.  These instructions were crafted on MacOS Lion, which should prefer 64-bit Java when possible (Applications/Utilities/Java Preferences).  These instructions assume the default Minecraft.app location, in the main /Applications folder.  I had a few tabs open, while I was sussing this out, including an excellent forum post, a post on JavaApplicationStub bits, and the official reference for CF keys.

Here we go.

Swap out Minecraft's JavaApplicationStub for the current OS' version:
  gzip /Applications/Minecraft.app/Contents/MacOS/JavaApplicationStub
  cp /System/Library/Frameworks/JavaVM.framework/Versions/Current/Resources/MacOS/JavaApplicationStub /Applications/Minecraft.app/Contents/MacOS/

Then, add 64-bit architecture to Minecraft's possibilities:
  /usr/libexec/PlistBuddy -c "Add :Java:JVMArchs:0 string 'x86_64'" /Applications/Minecraft.app/Contents/Info.plist

Launch.  That should do it.  Watch out for creepers.  Have a nice day.


* * *


If everything goes wrong, here's how to roll back from here to your original configuration:
  rm /Applications/Minecraft.app/Contents/MacOS/JavaApplicationStub
  gunzip /Applications/Minecraft.app/Contents/MacOS/JavaApplicationStub.gz
  /usr/libexec/PlistBuddy -c "Delete :Java:JVMArchs:0" /Applications/Minecraft.app/Contents/Info.plist


How to tell if you're using a 64-bit kernel in the first place is easy.  Look for "x86_84" in the output of the below command.  If you see i386 or ppc, you might be on a system that can't handle 64-bit, or you might need to instruct the system to boot with a 64-bit kernel.
  uname -a   # should include "x86_64" in the output.


What's this JavaApplicationStub anyways?  It's like a chain loader .. only different!  When you double-click the Minecraft icon, the Finder looks in Info.plist for the CFBundleExecutable value.  It launches that, to start the app.  The JavaApplicationStub is a native binary that helps invoke Java in the right way to get Minecraft running.

What's that PlistBuddy command?  It's a command-line tool included in more recent releases of Mac OS, that lets you directly read, write, erase, fold, spindle and mutilate Plist.info files.  It's got a man page, but here's a quick example of reading your JVMArchs array, if you want to double-check that it's got x86_64 at the top:
  /usr/libexec/PlistBuddy -c "Print :Java:JVMArchs" /Applications/Minecraft.app/Contents/Info.plist

What's with you and the command line stuff?  I don't know.  I suspect that my epitaph will simply be an elegant one-liner.

Monday, November 14, 2011

Suzuki Gladius SFV650 Turn Signal Size

The Suzuki Gladius SFV650's turn signal bulbs are 1156 A Offset Pin size.  Since it took me a while to figure it out, hopefully this will save someone else a bunch of searching.

I have no idea what the 1156 is for, except that one of the 1s indicates that it's a single filament bulb.  The "A" is for "Amber" because the bike's turn signal cover is clear, so the bulb has to be amber tinted.  And the "Offset" pin configuration means that the two bayonet pins are not exactly across from each other on the circumference .. one is "offset" from a straight-across position.  So, the pins are closer to each other on one side, and farther on the other.  Wacky.

Saturday, November 5, 2011

P4 Chronicle Beta on CentOS 5

(UPDATE: "Getting into" the beta is actually no big accomplishment.  Installing on 64-bit CentOS 5 is, tho.  Got it done!)

I got into the P4 Chronicle beta.  They support it on Centos 6 .. but my stuff is all still 5 .. at least the publicly available servers are.  It looks like the only thing I'll need to do is get PHP 5.3, which EPEL has.  I'm gonna document this one on its own page.  The neat shift in Chronicle is that it puts real version control right on the server .. which is worlds apart from just an RDBMS.  At least that's how I'm summing it up, so far.

Mounting an iDisk on Linux (Quick and Dirty)

Here's how to get your iDisk mounted in your home directory on a linux machine.  You'll need to have sudo privileges.  Also, you'll need to type your iDisk username and password by hand, when prompted.  You could automate all of this quite nicely, but I'm only interested in an as-needed one-liner that I'll copy and paste (or script).

First-time, you'll need the davfs2 package installed.  If you're on debian (ubuntu) apt already knows where it is.  If you're on redhat (centos) you'll need to add Dag's rpmforge repo, before yum will be able to find davfs2.

  sudo apt-get davfs2  # for debian/ubuntu users.
  sudo yum install davfs2  # for redhat/centos users who have rpmforge enabled.
  # if yum can't find it, you need to install the rpmforge repo from http://repoforge.org/use/

Then, you can issue this one-liner to make a mountpoint (fine if it exists already); and mount your idisk on it, owned by you.  (You might make this is a script in your home directory, for easy access.)

  sudo mkdir $HOME/idisk ; \
  sudo mount -t davfs https://idisk.me.com/YOURICLOUDUSERNAME \
    $HOME/idisk -o rw,uid=`id -u`,gid=`id -g`

After, when you're done, unmount your idisk, to make sure that all of your changes have been uploaded.

  sudo umount $HOME/idisk

Hopefully this is a good starting point for someone who wants to automate this when a user logs in.  You may need/want to have FUSE involved in that.  I'm not talking about just adding it to /etc/fstab .. there's a "right" way to do it magically per user, and only when they're logged in.  Extra points for letting it remember your password.  Please add a comment if you've done it!

Tuesday, August 23, 2011

Making your Macbook Air USB Drive Read-Write

So, you want to re-use that cute little USB recovery drive that came with your Macbook Air?  You're supposed to officially say "yeah I want to update it to be a Lion recovery disk," but this fanboy knows you just want to have an adorable, Apple-branded USB drive that fits in your wallet.  Admit it .. if only to yourself.

The ultimate how-to for this, and what I'd recommend, is MacBenTosh's YouTube video.  It explains everything perfectly.  But I know I'm gonna need to do this again, so I'm writing my own abbreviated notes:

  • Download the Chinese windows-only low-level USB formatting tool.
    • It's a mine-field of ads and baited clicks.  Pay attention.
  • Pop the USB drive into your windows machine and run the formatting tool.
  • Click "Scan USB."
  • When it finds the drive, click its "Port n" line to select it, then click "Start."
  • The USB drive is now read-write and formatted FAT32.  (Geez that was fast.)
    • I leave it like this, for cross-platform compatibility.  I lose fanboy points for that.
  • That's it!  Have a nice day.
BTW, you don't need to go to so much trouble to get the nifty icon back.  Before you unlock the device, just pop it in your Mac, then select its desktop icon and "Get Info" (Command-I) on it.  Click the icon in the upper-left of the info window and Copy.  Open something like Textedit and paste it in a new document for safe-keeping.  (If you don't default to rich-text in Textedit, you'll need to Format &gt; Make Rich Text. ) After the conversion, pop it back into the Mac, select it on the desktop and Get Info again.  Then select the generic icon in the info window, and Paste the fancy one back.  Ta-da!

Saturday, July 30, 2011

Hacking a 120 Film Roll Down to 620 Size

I picked up a Brownie Hawkeye camera a couple weeks ago.  I thought it took 120 format film, but it actually takes 620 format film.  620 film is the original "printer cartridge extortion" scheme.  It's exactly the same film as 120 format, but the end caps of the spool are slightly thinner, and they're of a slightly smaller diameter than 120.  The barely-bigger 120 spools won't fit in a 620 camera; you have to buy Kodak 620 Film.  Bastards.

If you're lucky, which I was, the camera had an empty 620 spool in it.  You can put this on the receiving side, to let the camera reel the exposed film onto.  So the challenge is just to get a roll of fresh 120 film to fit onto the unexposed side.
My workshop classmate Nalini brought me a stack of info on this.  (Thanks!)  Some people modify new 120 rolls that have fresh film on them.  Other people hack empty 120 spools to look like 620, then use a changing bag to pull the film off a 120 roll, and then roll it back onto their hacked 620 roll.  I haven't tried any method yet, so I don't know.  But here's what I've learned about modifying a 120 spindle to fit like a 620 spindle.

You have a few choices for reducing the diameter of the 120 roll's spindle ends.

  • I tried shaving the ends down to a narrower diameter with a Dremel.  This was really ugly.
  • Clipping the ends down with large nail clippers worked pretty well.  I recommend it.
  • But my favorite was using a pair of electricians' scissors to trim down the diameter.  Clean and easy!
And then you've got options for thinning down the spindle ends, too.

  • Some folks recommend thinning it down with a metal file.  I'll bet that works nicely.
  • I tried using the Dremel with a sanding disc, and it was a little sloppy.  (But worked.)
  • Better was to use the cylindrical sander attachment for the Dremel.  Nice and tidy!

So now I've got an empty 120 spindle that fits in a camera that takes 620 film.  I'll try pulling 120 film off another spindle and feeding it back onto my make-believe 620 spindle.  Then I'll try taking a loaded 120 roll and trimming off the ends with the unexposed film still on.  And after that, well, you can actually still buy 620 rolls, it's just a specialty item.

I'll report back with details about what worked and what didn't.

Wednesday, July 20, 2011

Making Google TV forget your Netflix account info

I've tried the "official" way.  That's where you go into the application settings for the TV, find Netflix, and select "Clear Data."  It even warns you that your account information will be lost.  And then it does absosmurfly nothing.  Punks.

Here's how to *actually* get your Google TV's Netflix app to forget your login information.
  • Launch the Netflix app.  (Even if it gives you an error about connecting.)
  • Use the navigational arrow buttons in the upper-left region of your remote's face.
  • In sequence, press these arrow buttons : up, up, down, down, left, right, left, right, up, up, up, up.
This will either make Chun Lee shoot a big blue fireball that decapitates your enemy, or it will pop the Netflix app into a bit of a debug mode.  Press the down arrow to select the "Deactivate" option and press the Enter button on the remote.  Poof!  The app should restart itself and prompt you again for all your account eenfos as if you never met it.

Tuesday, April 19, 2011

Upgrading an AT&T Dell Streak to Android 2.2

Back when there was a lot of fanfare, I bought an "unlocked" Dell Streak right from the dell.com web site. It arrived, and it was pretty clear they'd rushed it out the door with a kluged together Android 1.6 installed on it.  It was an unmitigated heap of garbage.  But they promised a forthcoming update to Android 2.2, with unlocked units getting the update as soon as it was available.

It turns out that most of the "unlocked" units (purchased at additional expense, since you didn't sign a contract with a carrier) were actually locked to AT&T.  You can't get the update.  Dell lists a manual download in their FAQ, but that one fails to install.  Doing a manual check for new system software results in a message that you're up to date.  Nothing works.

Well, from the seventy-fifth page of a thread on Dell's self-support forums, here's the update, which will install on your "unlocked" Dell Streak that's actually locked to AT&T.  Download it on the Streak's browser, then tap it to install:

  http://mobileupdate.dell.com/PackageProductionLocations/Streak_340_14844_31.pkg

It installed for me!  If you're in the same boat, I hope this helps.  Hopefully this cleans up some of my issues.  If not, I can just throw it back in the closet for another six months..